

Creating Purchase Orders
Build a routing-aware purchase order from the products that need a reorder, fine-tune quantities and costs in the order document, and export a PDF for your supplier.
A purchase order in Profit Hawk starts with a routing decision: how does this inventory get from your supplier to where it sells? You pick the route, Profit Hawk sizes the order for those destinations, and the order opens as a document you can edit line by line and export as a PDF for your supplier.
When to create a purchase order
Create a purchase order whenever the Restock tab on the Inventory Overview shows products that need a fresh supplier order. Most sellers run this on a weekly or bi-weekly cadence aligned with their supplier's order windows.
If you have not used the Restock tab to identify reorders yet, start there: Identify Reorders.
Creating the order
Start from the Inventory Overview's bulk action toolbar.
Select products on the Restock tab
Open the Inventory Overview, switch to the Restock tab, and use the row checkboxes to select the products you want on this order.
Click Create Order
The bulk action toolbar appears at the bottom of the screen. Click Create Order to open the two-step order dialog.
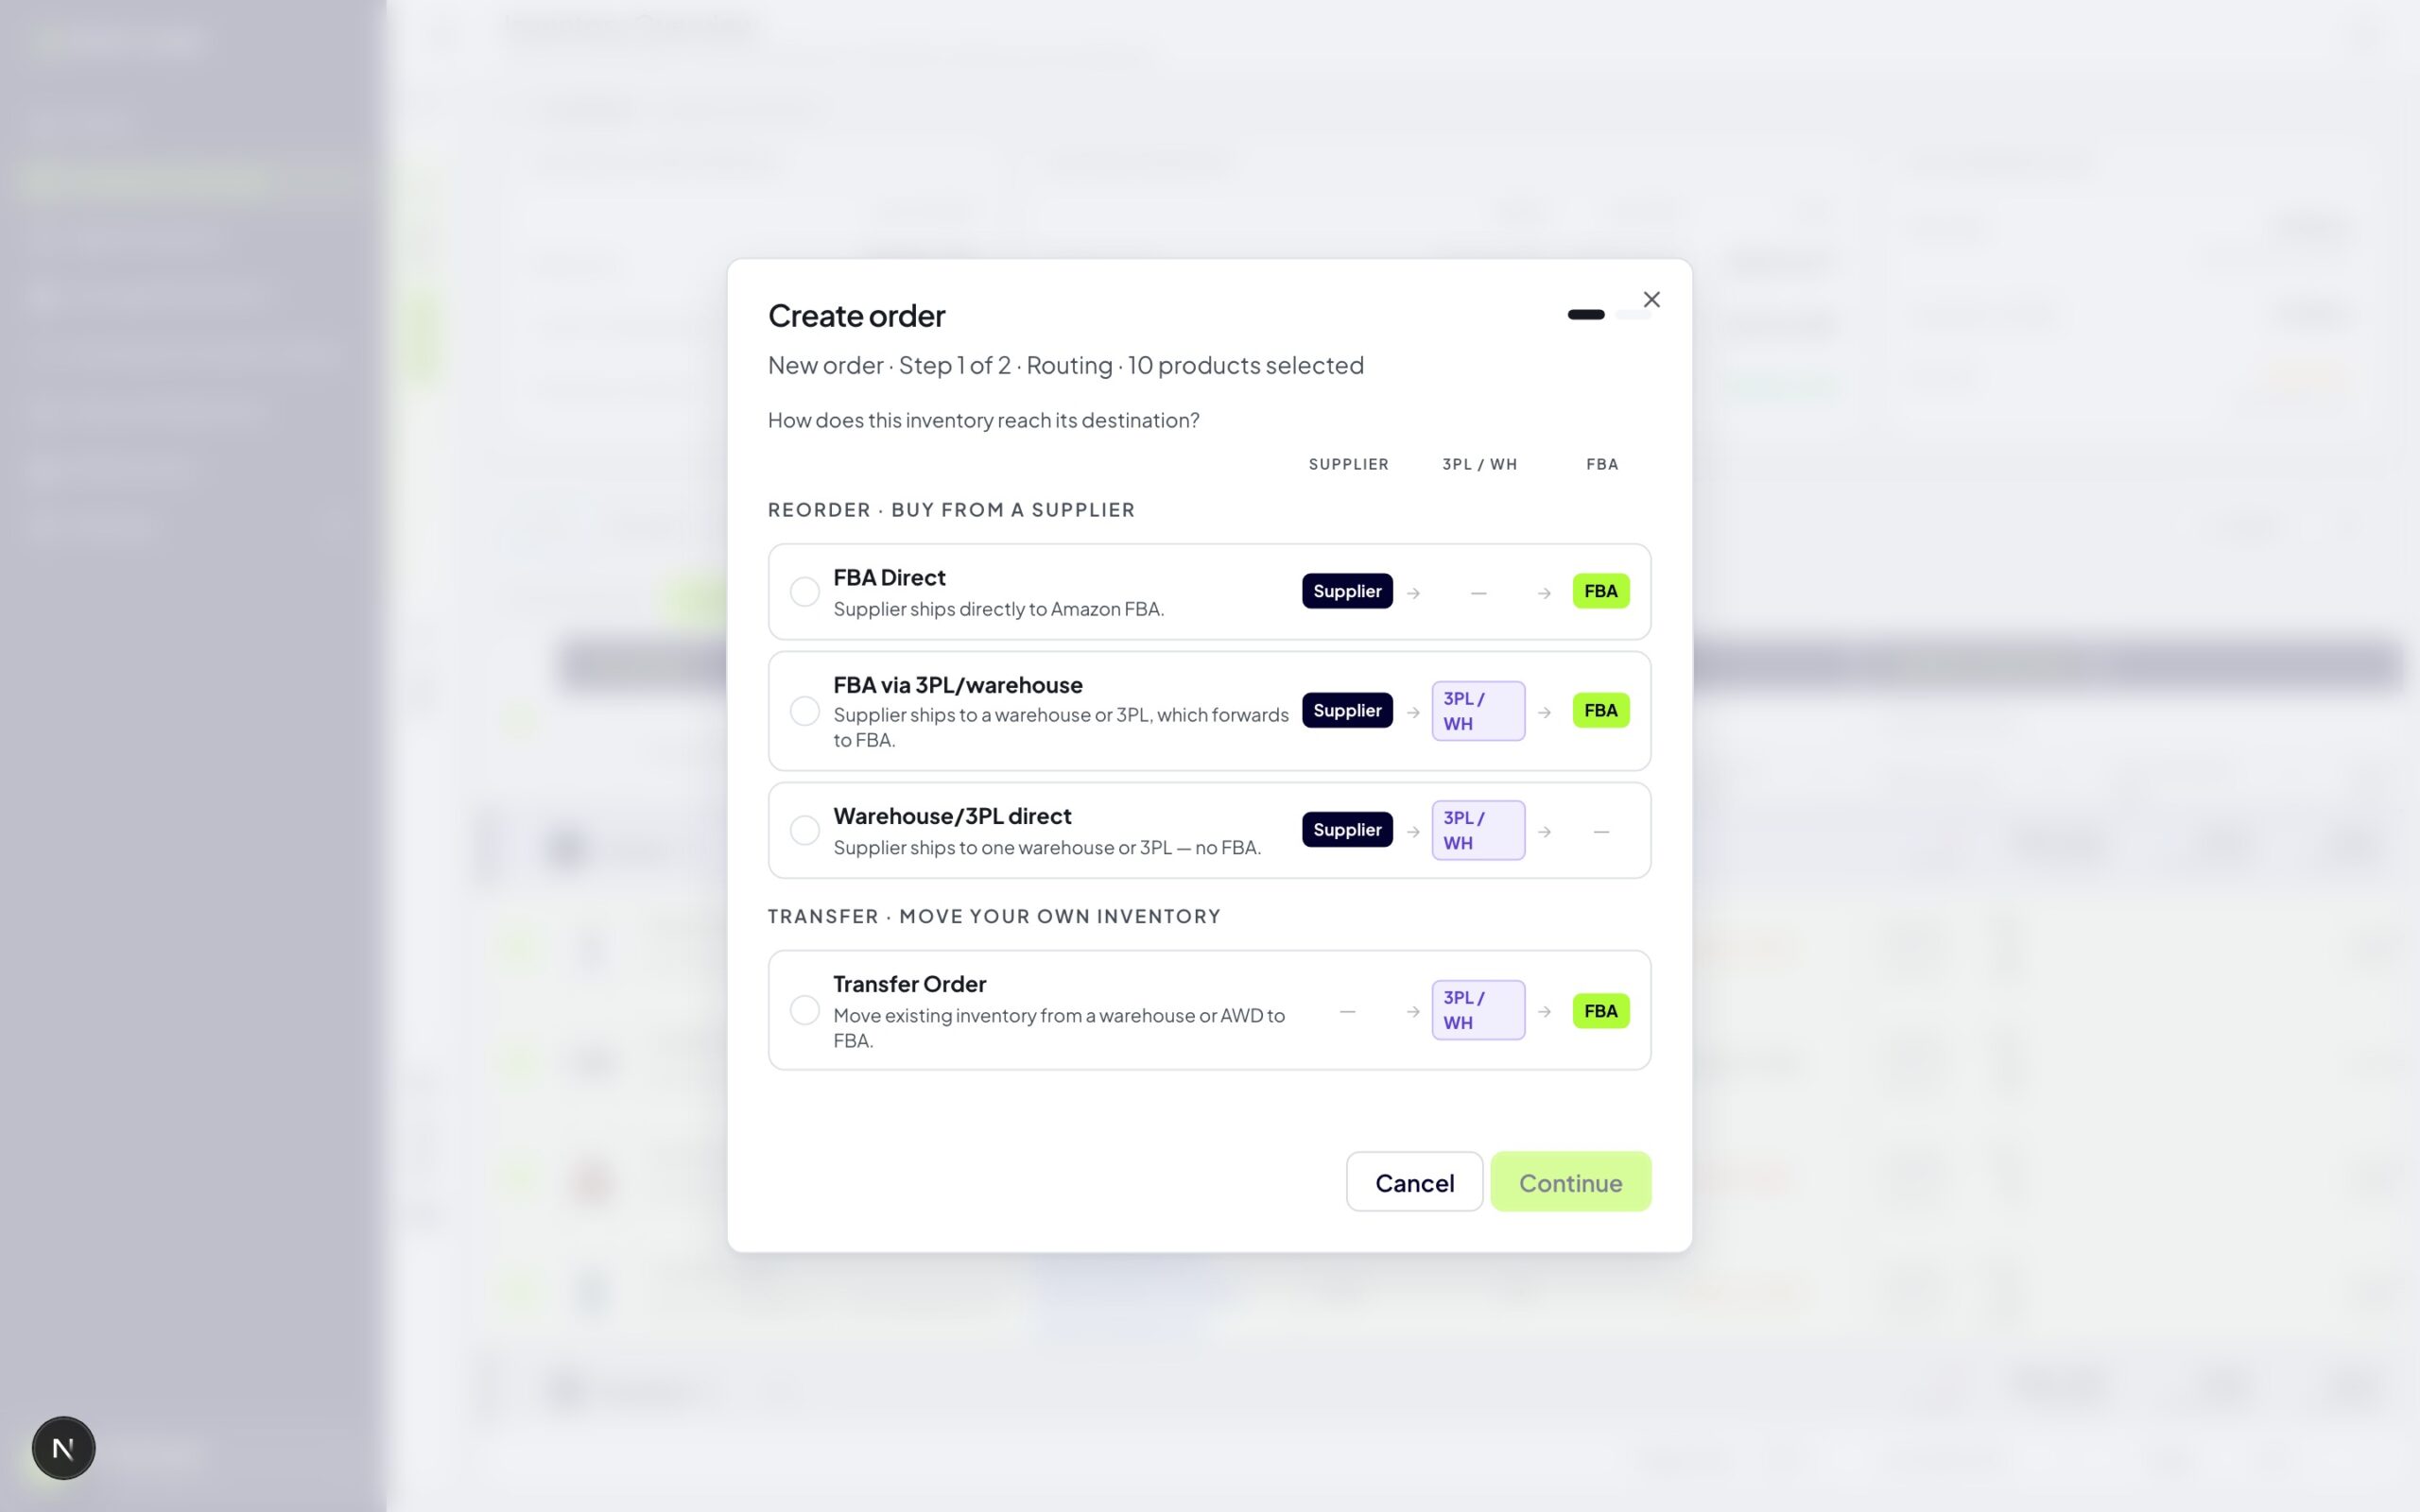
Step 1 — Pick the routing
The dialog asks: How does this inventory reach its destination? Under Reorder · buy from a supplier, pick one of three routes:
- FBA Direct -- your supplier ships directly to Amazon FBA
- FBA via 3PL/warehouse -- your supplier ships to a warehouse or 3PL, which forwards the stock to FBA
- Warehouse/3PL direct -- your supplier ships to a single warehouse, with no FBA leg on this order
The routing is locked once the order is created, so pick the route that matches how the goods will actually move.
Step 2 — Configure the order
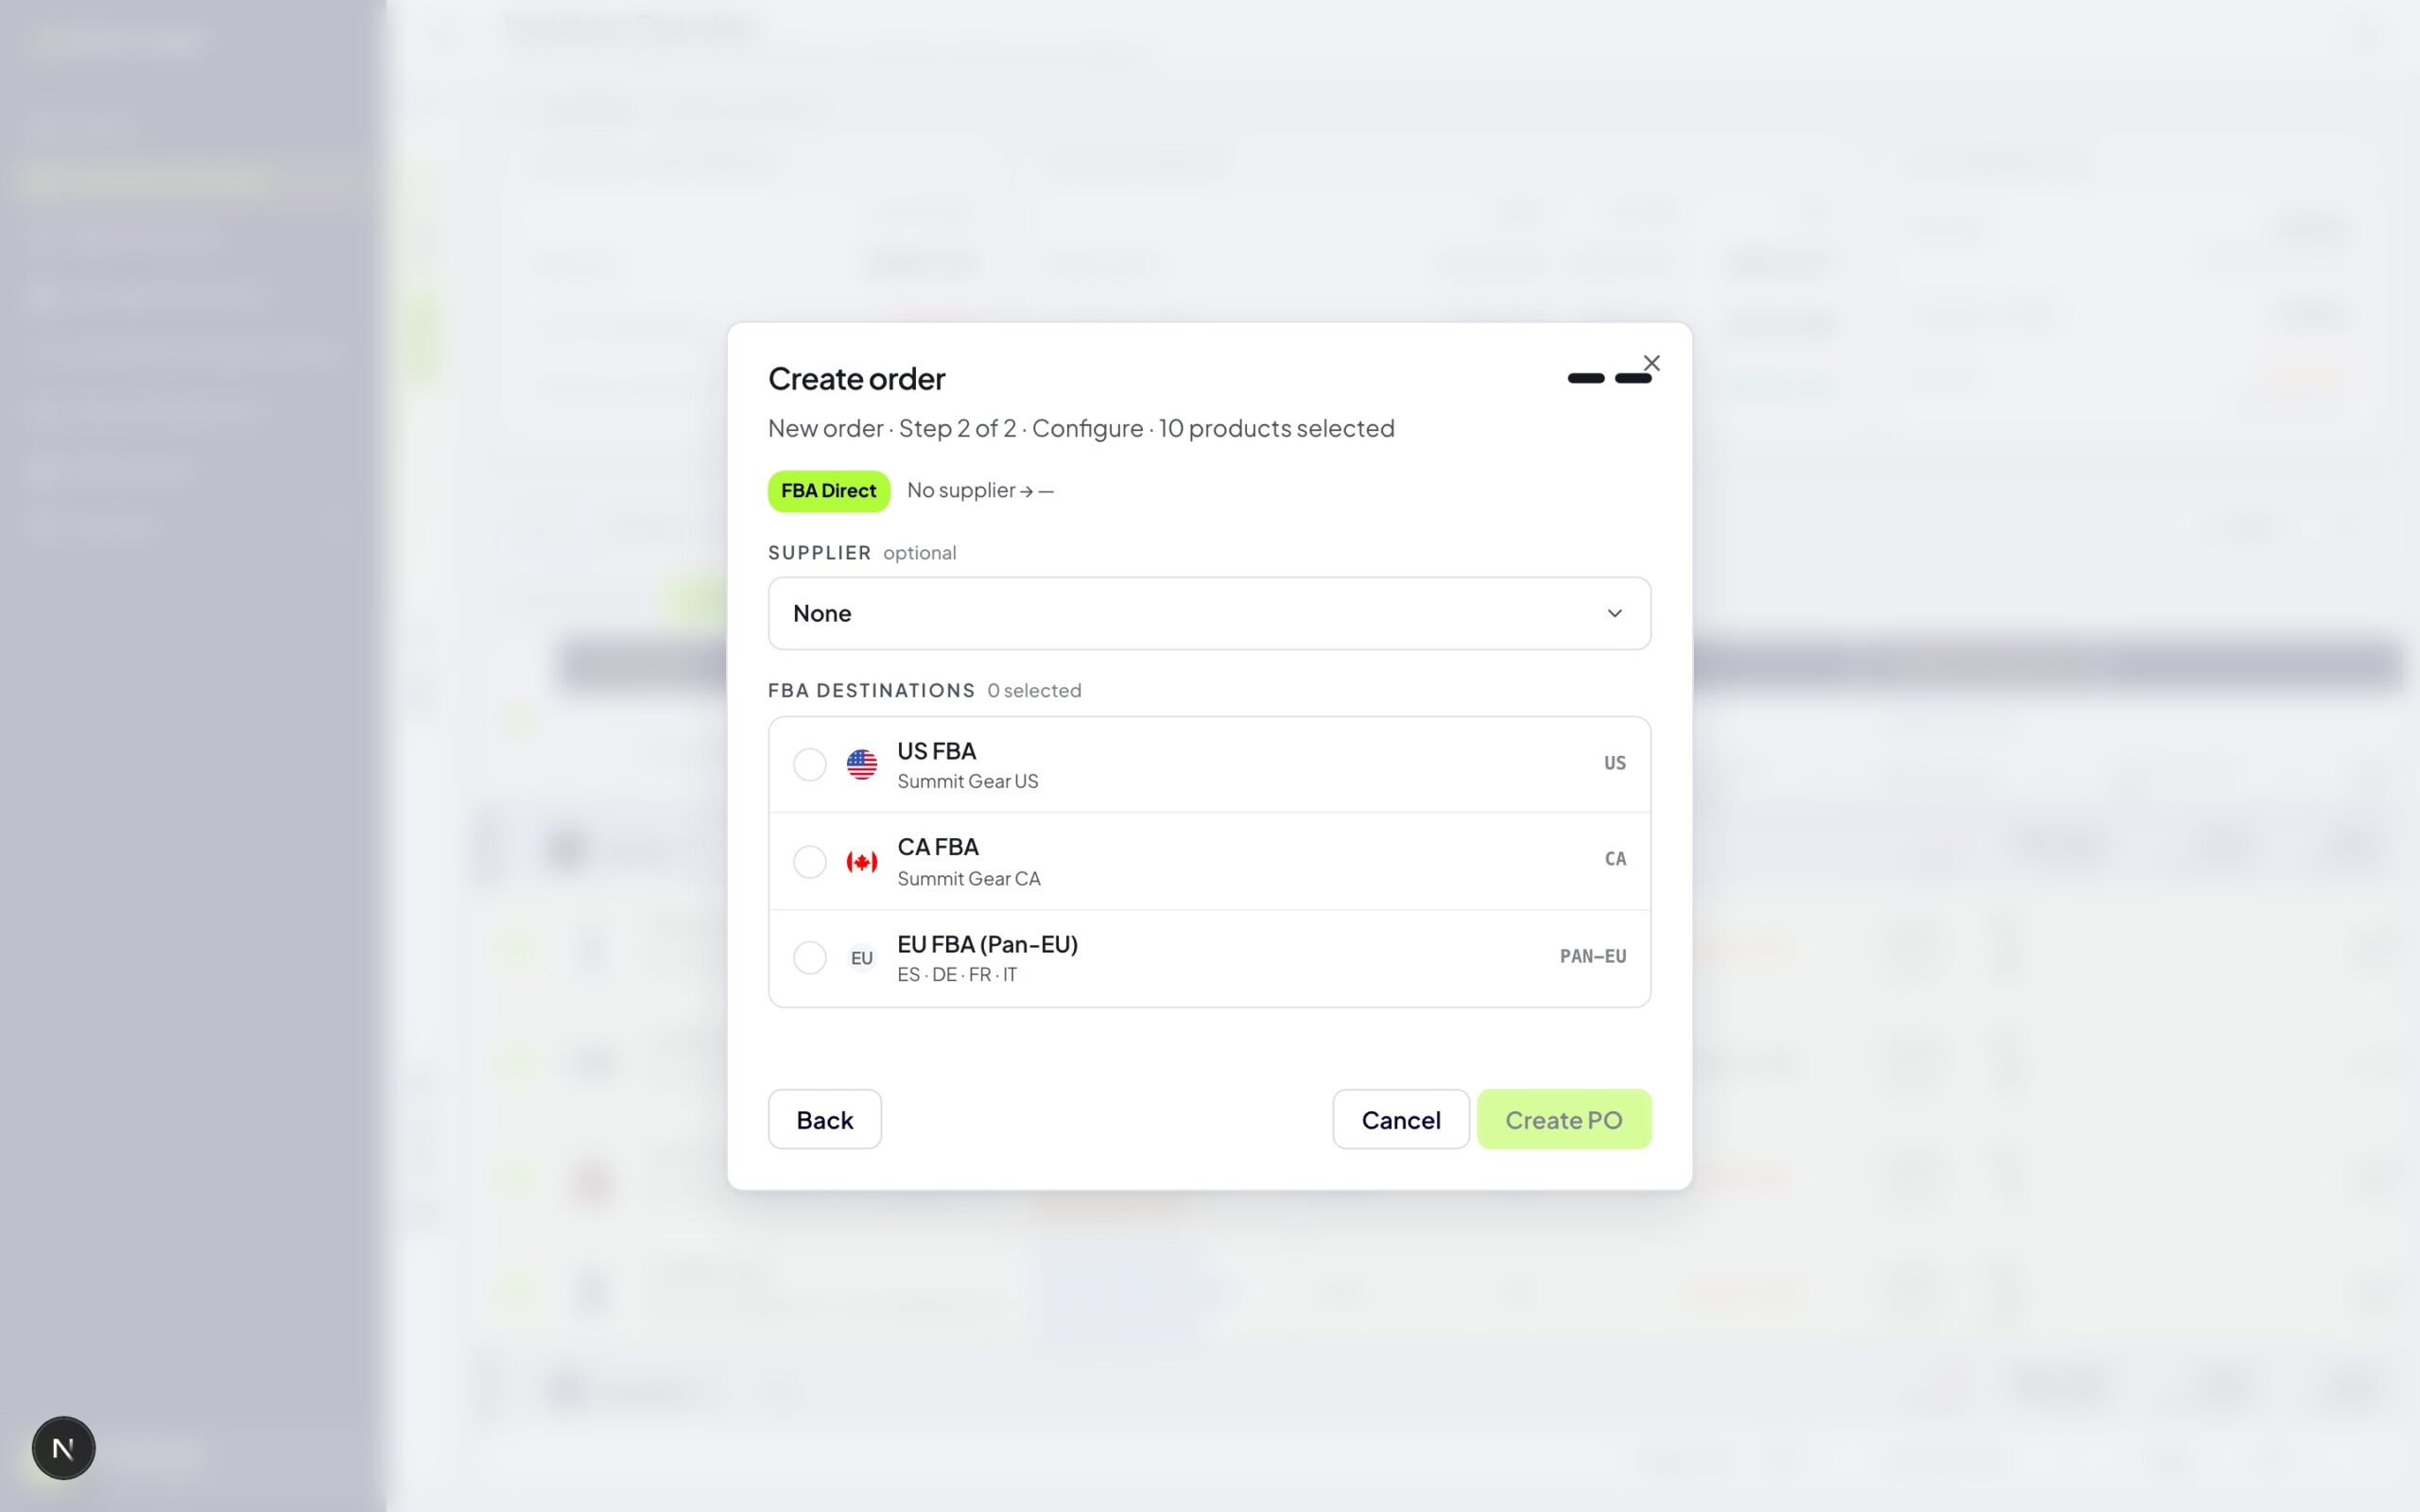
The fields adapt to the routing you chose:
- Supplier (optional) -- pick the vendor; add one first in Managing Suppliers if it is missing
- FBA destinations (FBA Direct) -- pick the fulfillment pools this order serves. Pooled programs appear as a single destination (one Pan-EU entry, one NARF entry) instead of one row per marketplace.
- Route through (FBA via 3PL/warehouse) -- pick the one warehouse or 3PL the supplier ships to; the FBA pools are derived automatically from the sales channels that warehouse serves
- Destination warehouse (Warehouse/3PL direct) -- pick the warehouse receiving the goods
Create the PO
Click Create PO. Profit Hawk creates a draft order with each selected product as a line, quantities recommended by the forecast and split across your destinations, and case-pack rounding already applied.
You land on the order document, where the rest of the work happens.
The order document
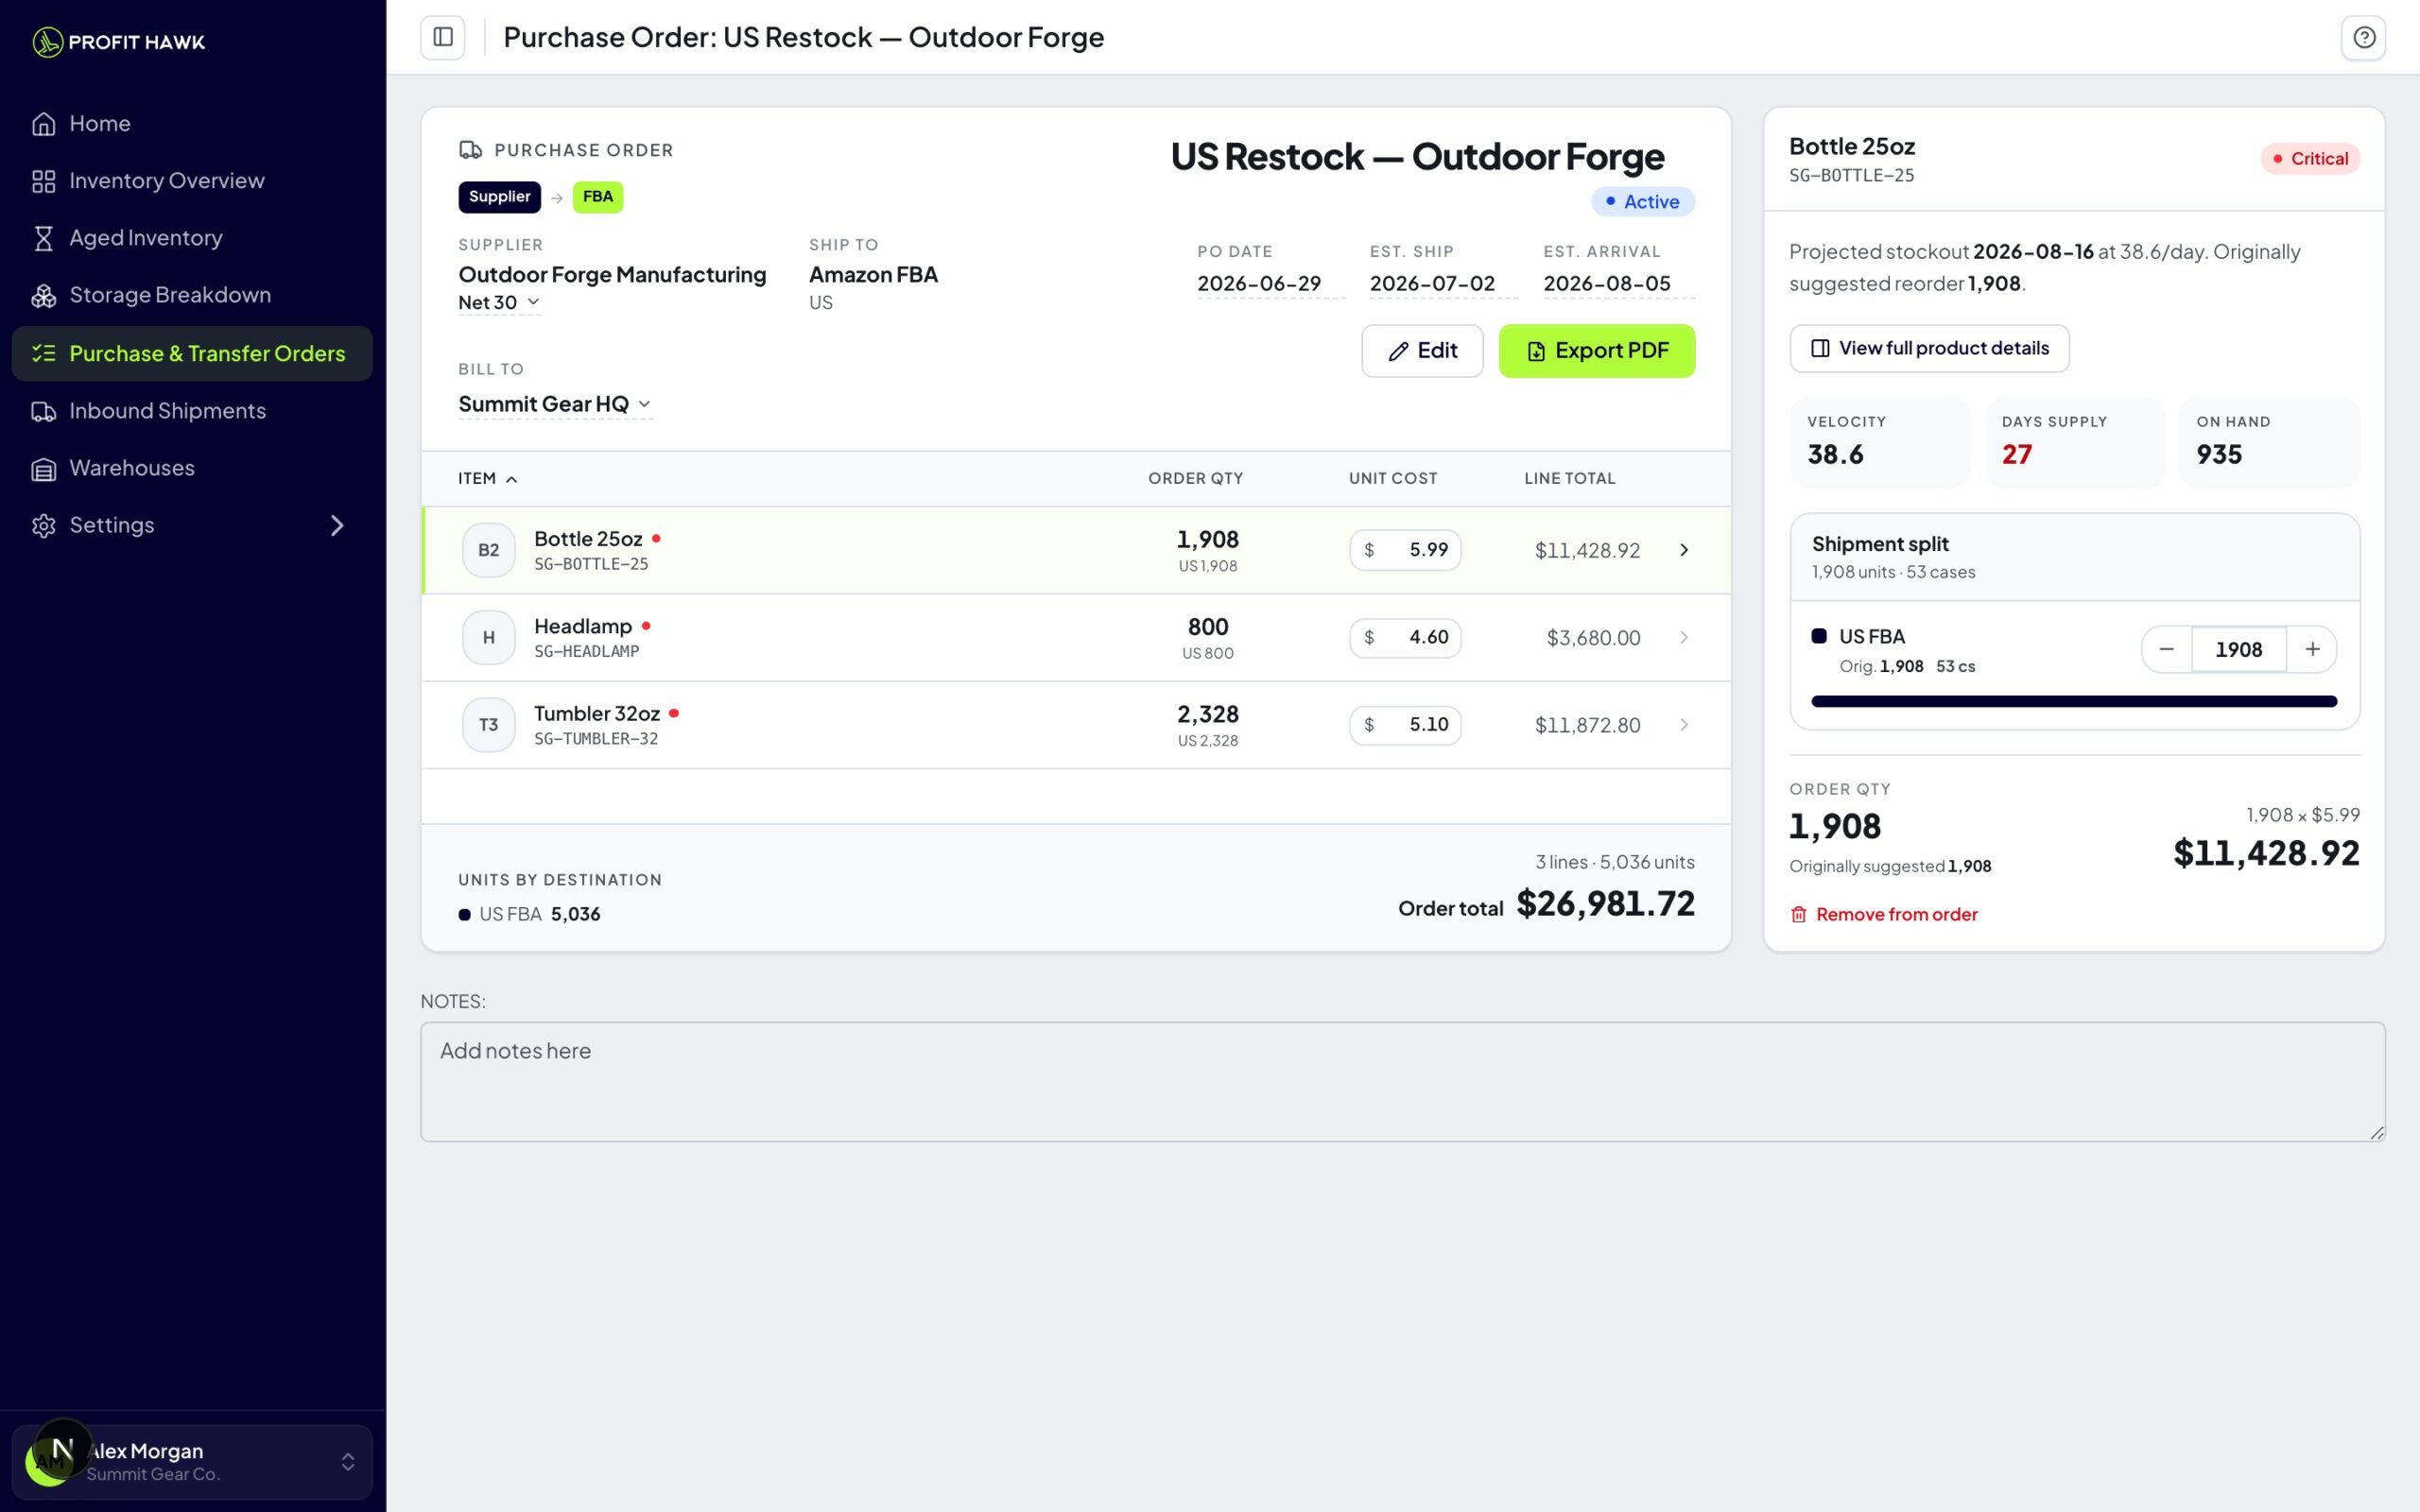
The order reads like the paper it will become:
- Header -- the routing chain, supplier, ship-to, bill-to, payment terms, and dates
- Line items -- one row per product with the order quantity, per-destination split, unit cost, and line total
- Detail panel -- click any line to inspect its health and adjust its shipment split
Header fields
Click a value to edit it in place:
- Order name -- defaults to the generated PO number; rename it for clarity (for example, "Acme -- April Order")
- Status -- Draft, Active, Complete, or Archived
- Payment terms -- standard terms like Net 30, or your own custom text
- Bill to -- which of your organization addresses appears on the PDF; defaults to your default address
- PO date -- when the order is placed
- Est. ship -- when the supplier is expected to hand the goods to the carrier. Keep it as the departure date, not the arrival date. Setting or changing it fills in Est. arrival for you, adding the lead times that come after production.
- Est. arrival -- when the goods are expected to arrive. On FBA via 3PL/warehouse orders this field is labeled Est. FBA arrival, because it describes the end of the chain, the FBA check-in rather than the 3PL delivery.
Est. arrival is the date the forecast plans around. It drives the Inventory Levels projection, and on an order heading for a warehouse it decides whether the stock counts inside your Inbound PO Window.
Type your own date whenever you know better than the estimate, for example when your freight forwarder confirms a delivery date. Be sure it is the date the goods arrive, not the date they leave, which belongs in Est. ship above.
Once you set the date yourself, Profit Hawk keeps it. It stops filling the field in for you, and later changes to the ship date or your lead times leave it alone. To hand the calculation back, empty the date box and click Apply. Profit Hawk starts working the date out again from your next ship date change.
Line items
Each line shows the order quantity with a per-destination breakdown, an editable Unit cost, and the Line total. Unit costs start from the product's manufacturing cost, converted into your display currency. Type a new cost to override it for this order, and the totals, the footer, and the PDF all follow. The footer keeps a running Units by destination summary and the Order total.
Once you have exported the order, its prices stop moving. See Your prices settle when you export.
Click any column header -- Item, Order qty, Unit cost, or Line total -- to sort by it; click again to reverse the direction. Lines default to sorting by product name, and the order stays put while you edit costs, so a row never jumps around as you work down the list.
The line detail panel
Selecting a line opens its detail panel:
- Live health -- velocity, days of supply, projected stockout, and an urgency chip, all scoped to this order's destinations. A product the forecast has not covered yet shows no health rather than a misleading "healthy zero".
- Forecast snapshot -- a muted line that captures what the forecast said for this product when the line was added (velocity, days of supply, projected stockout, urgency, and on hand). It is the frozen "why this was ordered" reference, so it stays put even as live demand shifts. Lines added before this feature, and products the forecast had not yet covered, show no snapshot.
- Shipment split -- the line's quantity per destination. Use the steppers, or type an exact quantity per destination. Reset returns every destination to the forecast's original suggestion, and the case count updates as you type.
- Profit Hawk warns when a destination's split drops below Amazon's recommended 5 cases per marketplace.
- Remove from order -- takes the line and its routed quantities off the order.
Recommended quantities respect your MOQ and case pack rules (MOQ & Case Pack Rules). Manual split edits are taken as entered, so double-check case counts when you fine-tune by hand.
Notes
The order document has a Notes tab for anything specific to this order. Use it for agreed pricing or payment terms, packaging and labeling instructions, QC requirements, or a reminder for whoever opens the order later. A small dot on the tab tells you at a glance when an order already has notes.
Notes save with the order and print on the exported PDF, at the bottom of the summary page, so they double as a note to your supplier. You have up to 2,000 characters.
Exporting the PDF
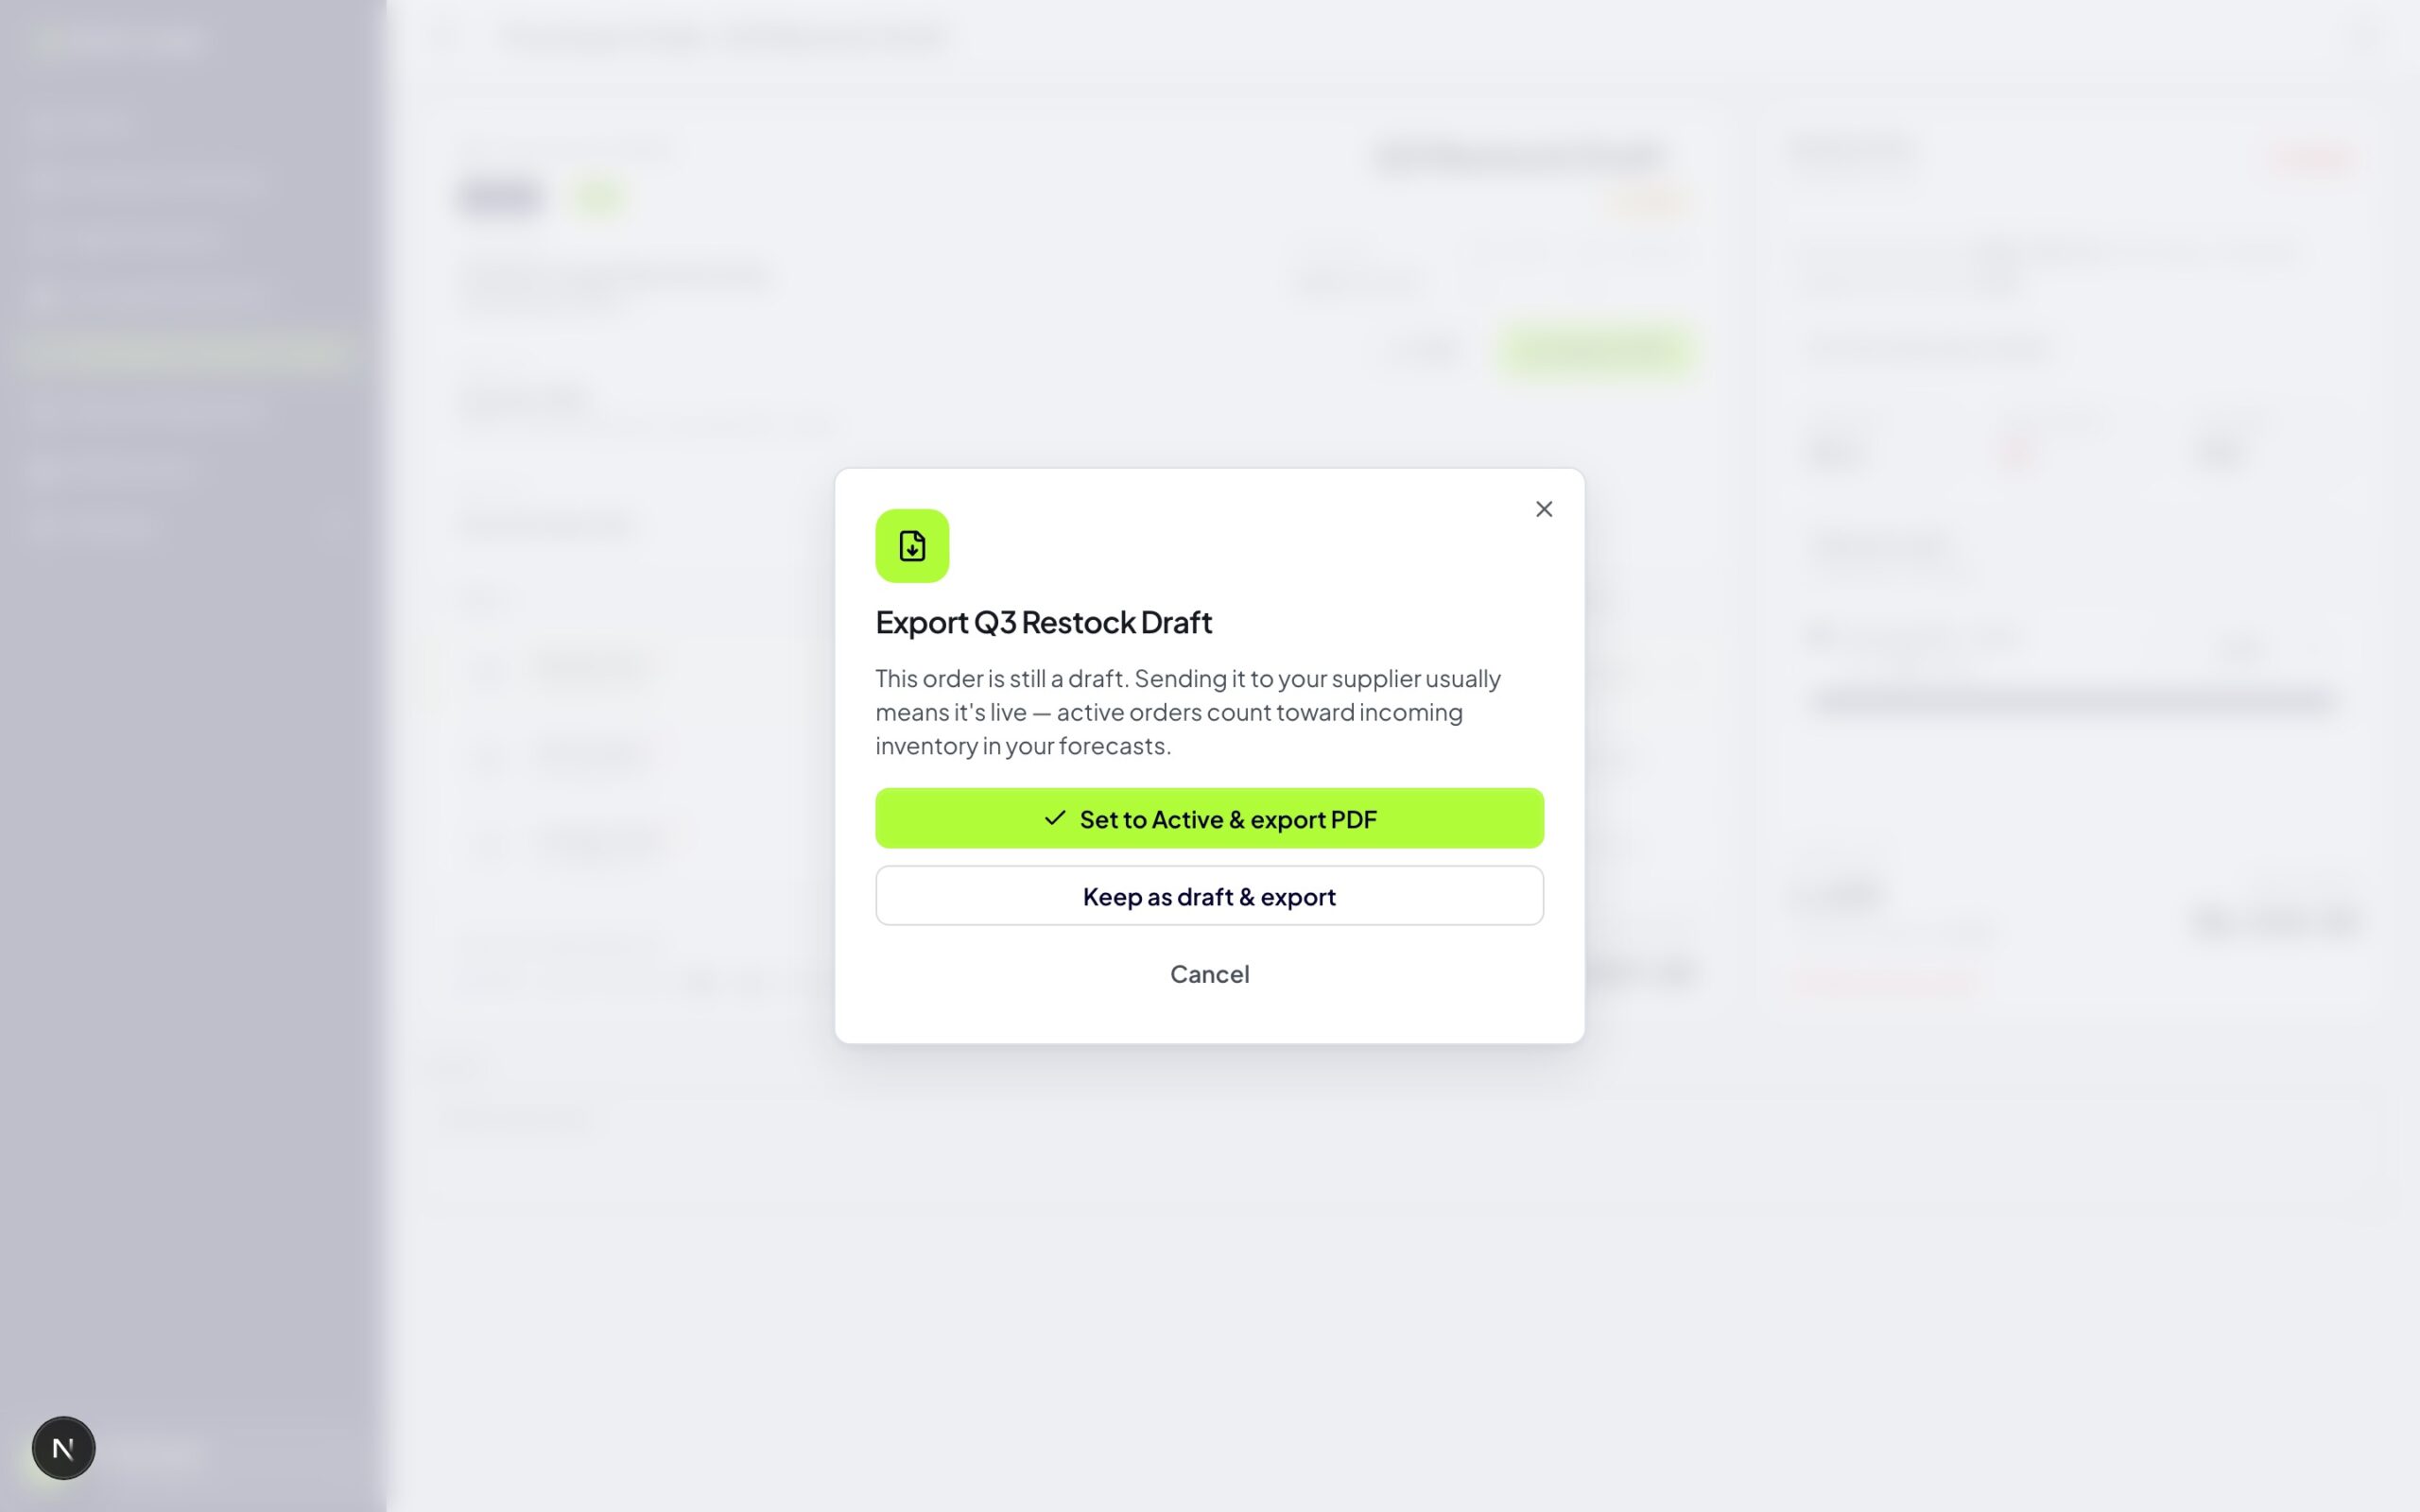
Click Export PDF in the header. For a draft, Profit Hawk asks how to handle the status in the same step:
- Set to Active & export PDF -- the usual path when you are sending the order to your supplier. Active orders count toward incoming inventory in your forecasts.
- Keep as draft & export -- for a preview or an internal review copy.
The PDF contains the order summary -- vendor, bill-to, ship-to, dates, payment terms, line items, totals, and any order notes -- plus a shipping breakdown page per destination so your supplier can label cartons correctly. The ship-to reflects the routing: for a direct order it is Amazon FBA, and for a via-warehouse order it is the warehouse, with a note that it forwards to FBA. Send it to your supplier via email or their order portal; Profit Hawk does not send it for you.
Your prices settle when you export
While an order is still a draft, its prices follow your current costs and today's exchange rates. Update a product's cost and the draft picks it up, which is what you want while you are still deciding what to order.
Exporting is what places the order. At that moment Profit Hawk records the unit cost printed on every line. Export the same order again next month and you get the same figures, even if the product's cost has changed or exchange rates have moved since. The copy your supplier holds and the copy you re-download are the same document.
That holds however the cost changed. Adding a new cost record, correcting an old one, or re-uploading your cost spreadsheet all leave a sent order exactly as it was sent.
To change a price on an order you have already exported, edit that line's Unit cost. Type the new figure and the totals, the footer, and the next PDF all follow. Nothing else moves it, which is the point: a purchase order is a record of what you sent, so it changes only when you change it.
A line you add after exporting is priced when you next export, as of the order's PO date rather than the day you added it. The lines already on the order keep the prices they went out with.
The PO date in the header is what a draft prices against. If you are recording an order you actually placed last week, set that date before you export and the draft prices as of that day.
Complete and Archived orders are finished documents. Their line costs and their PO date can no longer be changed.
When the order arrives
When the supplier ships, use Profit Hawk's inbound shipment wizard to package and ship the inventory to FBA. See Inbound Shipments for the full walkthrough.
Once those shipments exist, link them back to this order from its Shipments tab so the order tracks how much of it is already on the way. See Linking Shipments to an Order.
Once the order is fully received, set the status to Complete so it stops counting as incoming inventory. Completed orders can be archived for record-keeping.
Adding products to an existing order
If you have a draft in progress and find another product that should join it:
- Open the Inventory Overview and select the additional products
- Click Add to Order in the bulk action toolbar
- Pick the existing order from the list
Profit Hawk merges the new products in. If a product is already on the order, it is skipped (you will see a "skipped" count in the success notification).
Changing destinations later
You can edit a draft's destination channels, but the order is re-sized for the new destinations when you save: recommended quantities are recalculated and manual quantity edits are replaced. The dialog warns you before this happens. The routing itself (FBA Direct, via warehouse, warehouse direct) is fixed at creation.
Deleting an order
Draft and Active orders can be deleted. Deletion is permanent; there is no undo. Completed orders are kept for record-keeping and can only be archived.
Related
Identify Reorders
The full upstream workflow: how to find products that need an order before building it.
MOQ & Case Pack Rules
How MOQ and case quantity shape the recommended order quantities.
Managing Suppliers
Add and edit suppliers so they appear in the supplier picker.
Linking Shipments to an Order
Link the shipments you make in Seller Central back to this order to track inbound coverage.
Inbound Shipments
Build the inbound shipment to Amazon when the supplier order arrives.