

Creating Transfer Orders
Build a transfer order to move inventory from a warehouse, 3PL, or AWD into FBA, fine-tune the per-destination split, export a pick-list PDF, and turn it into an inbound shipment.
A transfer order in Profit Hawk moves existing inventory from a warehouse, 3PL, or AWD into FBA. Unlike a purchase order, you are not buying anything new; you are repositioning stock you already own. This page covers the full workflow.
When to create a transfer order
Create a transfer order whenever the Transfer tab on the Inventory Overview shows products with a recommended transfer quantity. Most sellers run this on a weekly cadence aligned with their 3PL pickup schedule or AWD shipment windows.
For the full upstream workflow, see Identify Transfers Needed.
Creating the order
Select products on the Transfer tab
Open the Inventory Overview, switch to the Transfer tab, and use the row checkboxes to select products to move.
Click Create Order
The bulk action toolbar appears at the bottom of the screen. Click Create Order to open the two-step order dialog.
Step 1 — Choose Transfer Order
The dialog asks how the inventory reaches its destination. Under Transfer · move your own inventory, pick Transfer Order -- move existing inventory from a warehouse or AWD to FBA.
Step 2 — Configure the transfer
- Source -- where the inventory is coming from: your 3PL, your own warehouse, or AWD
- FBA destinations -- the fulfillment pools the stock is going to. Pooled programs appear as a single destination (one Pan-EU entry, one NARF entry) instead of one row per marketplace.
Create the TO
Click Create TO. Profit Hawk creates a draft transfer order with each selected product and its recommended transfer quantity, split across the destinations you picked.
You land on the order document.
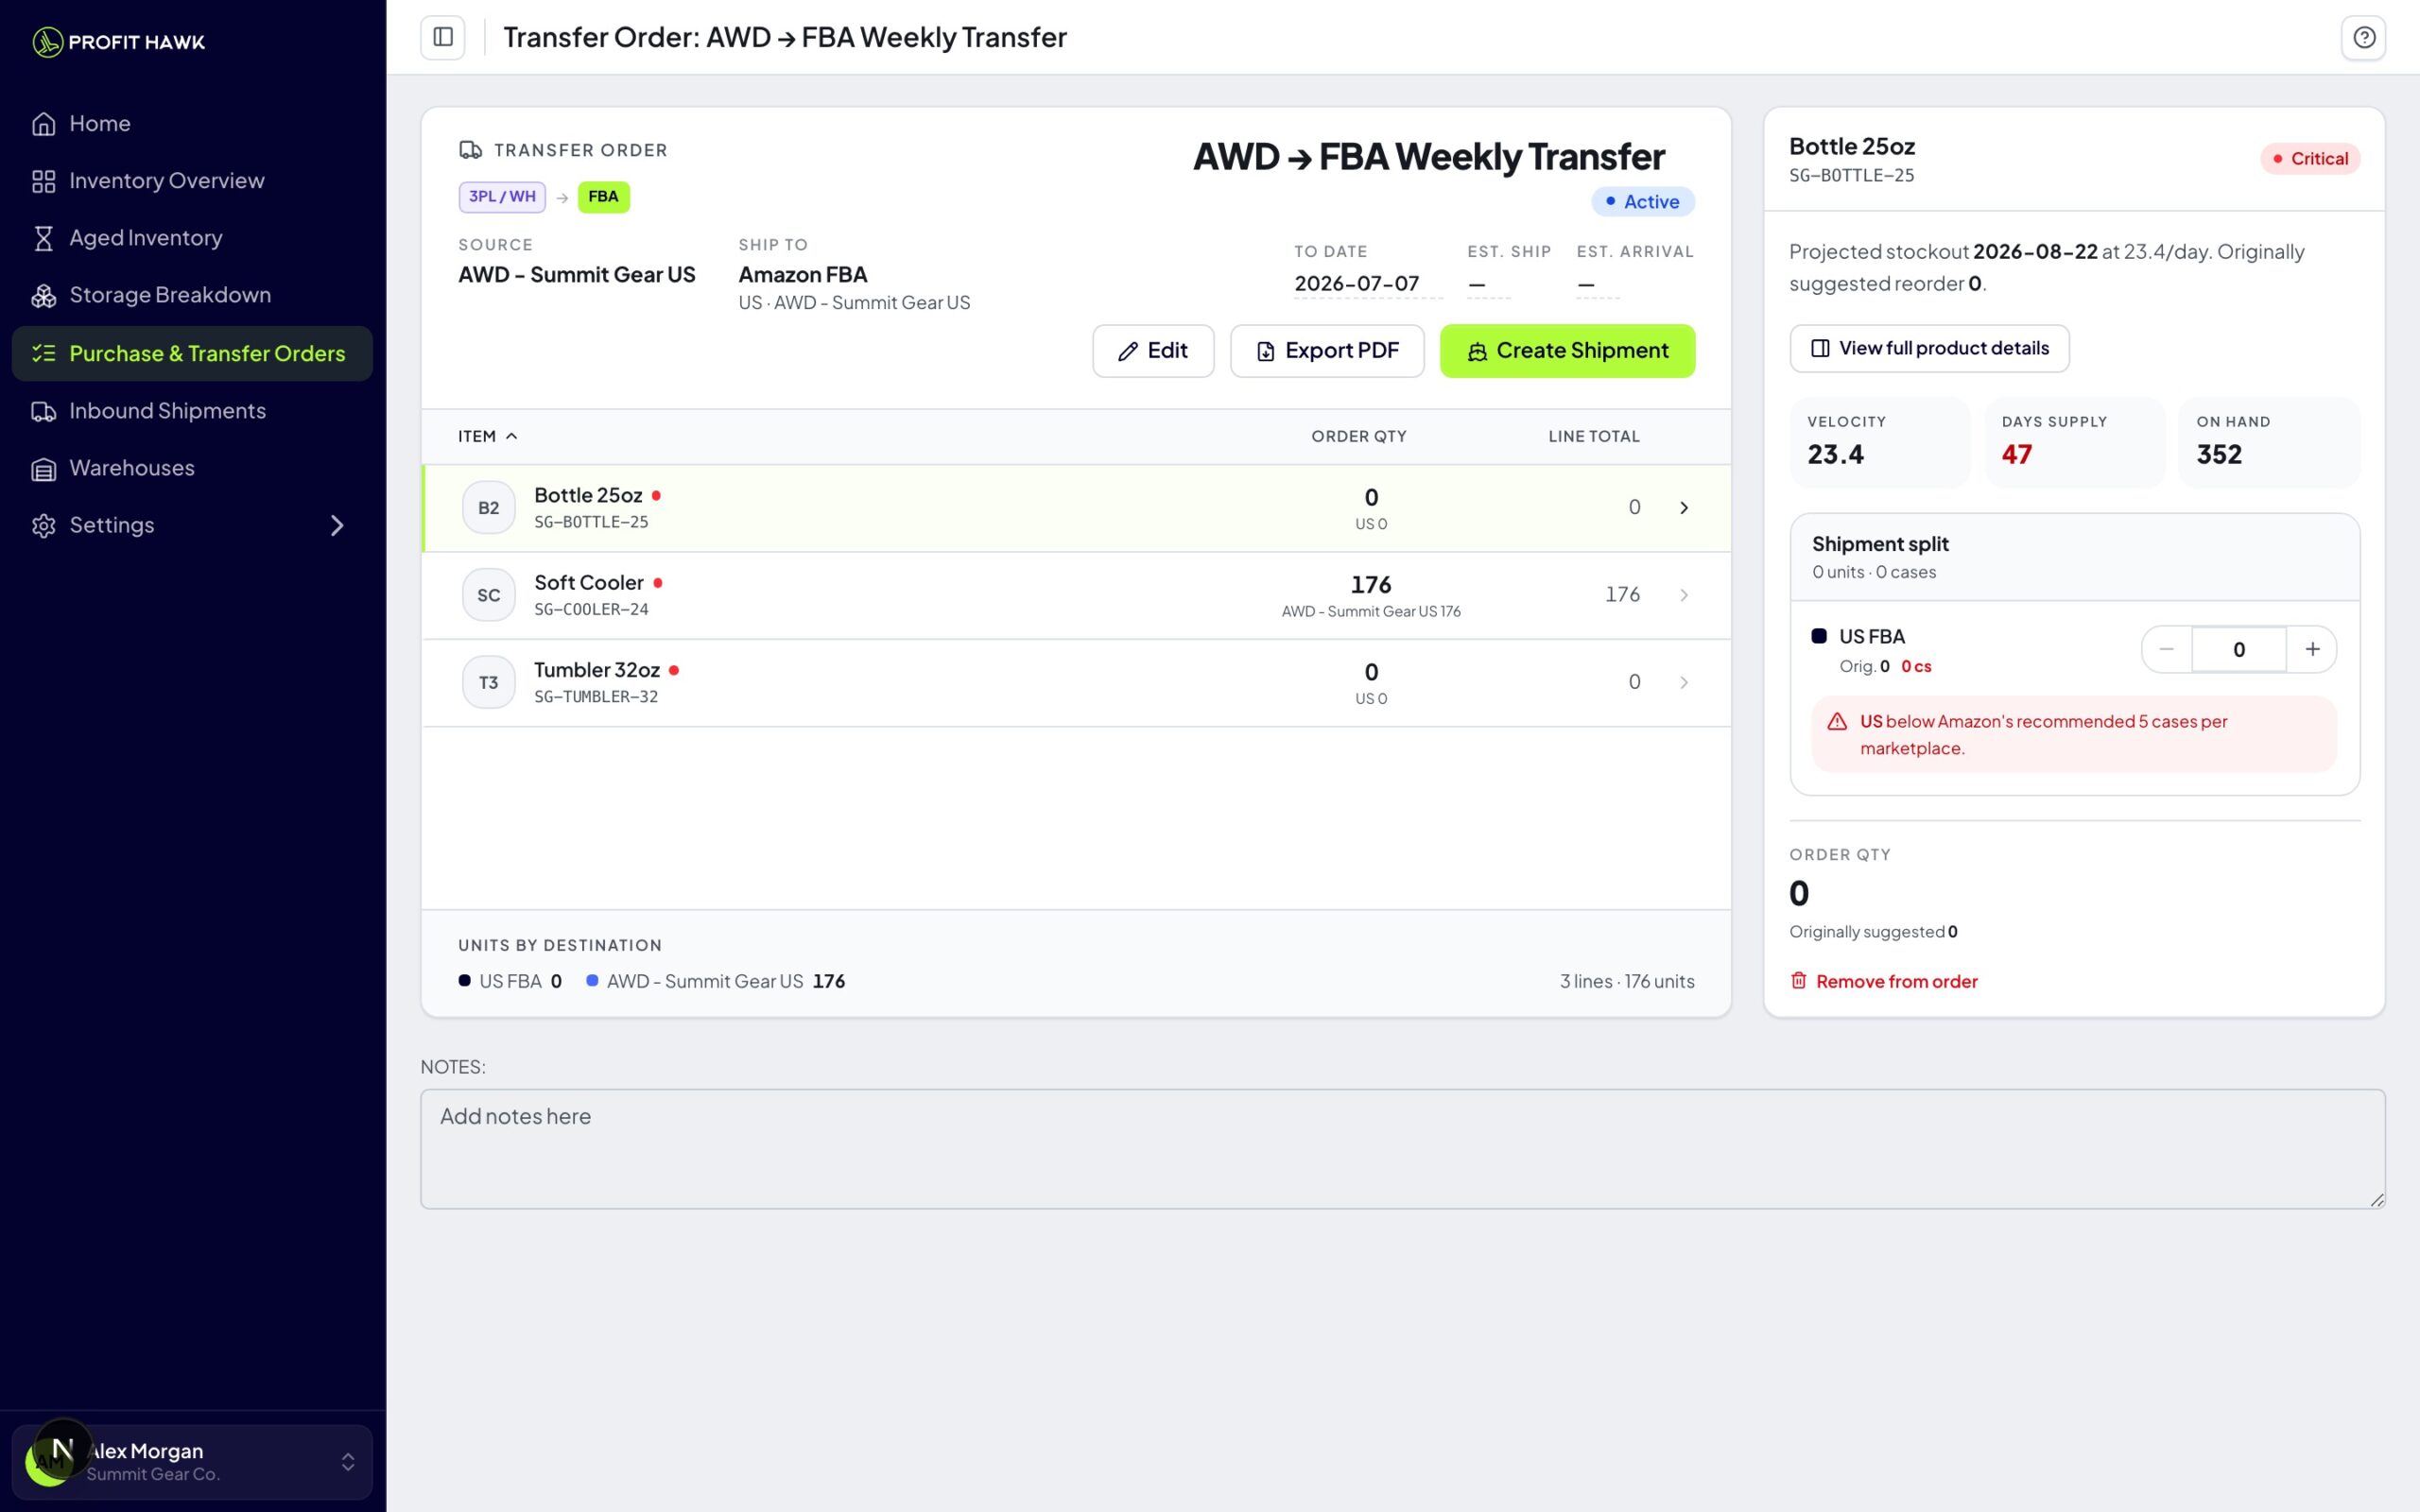
The transfer document
The transfer document mirrors the purchase order document, tailored to transfers:
- Header -- the transfer chain (warehouse to FBA), the source warehouse, destinations, and dates: TO date, Est. ship, and Est. arrival
- Line items -- one row per product with the transfer quantity and its per-destination breakdown. Transfers show no costs -- you are moving inventory you already own, not buying it.
- Detail panel -- click any line to see its live health (velocity, days of supply, projected stockout, urgency, on hand) scoped to the transfer's destinations, and adjust the per-destination split with steppers or exact quantities. Reset returns every destination to the forecast's suggestion.
- Notes -- the Notes tab holds a free-form field for anything specific to this transfer, like handling instructions or which stock to pull first. Notes save with the order and print at the bottom of the exported pick-list PDF (up to 2,000 characters).
Confirm the transfer quantities match what is actually at the source warehouse before building the shipment. If your warehouse balance in Profit Hawk is stale, the recommendation may have been capped too high.
Exporting a transfer PDF
A transfer's primary action is Create Shipment, but you can also click Export PDF in the header to print a pick-list PDF of what to pull from the source warehouse -- handy for your own team or a 3PL.
For a draft, Profit Hawk asks how to handle the status in the same step:
- Set to Active & export PDF -- the transfer is now in prep. Active transfers count toward incoming FBA inventory in your forecasts, so this stops Profit Hawk from continuing to nudge you that the transfer still needs creating.
- Keep as draft & export -- for a preview or an internal review copy.
The PDF lists the source warehouse it ships from, the Amazon FBA destination, and the per-destination quantities (no costs -- you already own the stock) and any order notes, plus a breakdown page per destination so whoever pulls the inventory can label cartons correctly.
Building the inbound shipment
Click Create Shipment in the document header to flow the transfer into Profit Hawk's inbound shipment wizard, which packages it into a real Amazon FBA shipment.
The wizard has five steps:
| Step | What happens |
|---|---|
| 1. Products | Confirm which products and quantities are in the shipment |
| 2. Packing Groups | Choose how units are packed (case-packed vs individual, single-SKU boxes vs mixed) |
| 3. Box Content | Specify what is in each box if needed |
| 4. Shipments | Amazon assigns the destination fulfillment centers; choose freight option |
| 5. Tracking Details | Add carrier and tracking numbers |
After the wizard, the shipment is created in Seller Central and tracked on the Inbound Shipments page.
The inbound shipment wizard creates a real shipment in your Seller Central account. Make sure quantities and packing details are correct before submitting.
Moving the order to Active
Once the shipment is created and physically being prepared, change the Status from Draft to Active. Active transfers count toward incoming FBA inventory in your forecasts, and the order continues to track the shipment through delivery and check-in.
When the transfer arrives
Profit Hawk syncs Amazon's receiving status automatically. The Inbound Shipments page shows shipped vs received counts as Amazon checks units in. When the shipment is fully received, mark the transfer order Complete.
If Amazon does not receive everything you sent, see Find Shipments Requiring Reimbursement for how to identify shortages and file claims.
AWD vs warehouse transfers
If your source is AWD, the inbound shipment is generally an AWD-to-FBA transfer that Amazon manages internally. The wizard still walks you through the same steps; the destination side is just simpler.
If your source is a 3PL or your own warehouse, you (or your 3PL) physically pack and ship the boxes. Tracking numbers from your carrier go in step 5.
Related
Identify Transfers Needed
The upstream workflow: how to find products that need a transfer.
Linking Shipments to an Order
Link existing FBA or AWD shipments to this transfer to track inbound coverage.
Inbound Shipments
Track shipments end to end and reconcile what was received vs shipped.
External Warehouses
Add a 3PL or your own warehouse as a transfer source.
AWD
How AWD inventory and shipments integrate with Profit Hawk.